
In this guide we'll show you how to take a screenshot on a Windows 10 PC. Taking a screenshot on a PC is a handy way to share all sorts of things. It may be that you want to share something you’ve seen online, or perhaps your computer is misbehaving, and you want to show tech support what you’re seeing.
There are a lot of different ways to screenshot on a Windows 10 PC, some methods capture what's on your screen and add it to your clipboard, some let you pick selections of the screen to capture, and one lets you immediately capture the whole screen and save it as a PNG image file.We’ll go over the various methods you can take a screenshot in Windows 10 and explain the options for more advanced and fine-tuned screenshots.
Before anything, identify your Print Screen key
Your keyboard should have a Print Screen button, though it may be written in shorthand, like "PrtSc". It may also be the secondary function of a key, so you may need to use the "Fn" key of your keyboard to use it.
Once you've identified your Print Screen key and whether you need to press the "Fn" key to use it, you're ready to go.
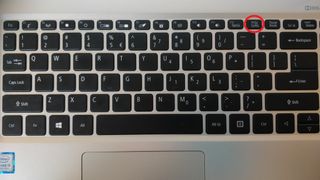
Image Credit: TechRadar
How to capture your whole screen
If you just want to screenshot everything happening on your monitor so you can share it with someone, the process is incredibly straightforward. You can also use a modified process to capture just your active window.
- Step one: Press the Print Screen key. (Alternate: To capture just your active window, press Alt + Print Screen instead.)
This will immediately take a screenshot of your whole display (including any extended desktops you have), or your active window if you follow the alternate process. The screenshot is added to your clipboard, allowing you to paste it elsewhere.
- Step two: Paste the capture screenshot where you want it.
You can paste it into an image editor, like Paint 3D, to edit and save it. Or, you can share it with a friend or colleague by pasting the image into a chat or email.
That's all there is to it if you just need a way to quickly share what's on your screen. However, there are more advanced ways to screen capture on PC.
How to capture your whole screen directly to a file
The above process is handy for one-off screenshots, but if you need to capture a series of screenshots quickly, we have a better process.
Copying to the clipboard means you need to paste the screenshot somewhere else before taking a new screenshot. If you don't paste it somewhere, the first screenshot will be overwritten by the second.
So, instead, you can use this method to quickly take a screenshot and have Windows instantly save it as a PNG image file.
- Step one: Simply press the Windows Key + Print Screen. (Alternate: add the Alt key to the key combination to save a quick screenshot of just your active window.)
That's all there is to it. Once you've performed that step, Windows will save the file. By default, it should appear in your This PC > Pictures > Screenshots folder file path.
When you perform a screen grab of the active window, it may not go to this folder, however. In our case, we saw the captures go to This PC > Video > Captures file path. Windows should present a pop-up when using this alternative technique though, so you'll be able to see where your screenshot is saved.
How to capture portions of your screen
If you'd rather be a little more precise with your screenshots, Windows 10 has a couple tools that can help you. The first is the Snipping Tool, but Microsoft is planning on replacing it with the Snip & Sketch app, which performs the same function. We'll focus on the latter, as it will have the most utility once the switch is made.
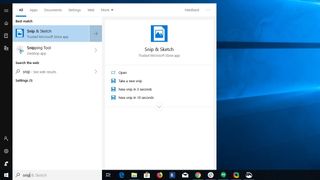
Image Credit: TechRadar
(Image credit: TechRadar)
- Step one: run the Snip & Sketch app.
You can simply type "Snip & Sketch" into the Windows 10 search bar to find the app and launch it.

Image Credit: TechRadar
(Image credit: TechRadar)
- Step two: In the top left of Snip & Sketch, press the "New" button.
This will darken your screen and provide a few options at the top of the screen. If you want to take a delayed screenshot, you can click on the down arrow next to the "New" button instead.
Advertisement

Image Credit: TechRadar
(Image credit: TechRadar)
- Step three: Click and drag to draw a box around the section of screen you want to capture. (Alternate: you can also draw a free-form capture space by selecting the Freeform option from the buttons at the top of the capture screen.)
As with the first screenshotting technique we went over, this method captures the screenshot and adds it to your clipboard. Snip & Sketch will also immediately display your new screenshot inside the app, letting your quickly edit it and save it as a file.
If you'd like to take an extra quick screenshot with Snip & Sketch, some more recent versions of Windows 10 (Creators Update and later) use the keyboard shortcut Shift + Windows Key + S to jump right into capture mode.


0 Comments
Thanks for comment.