
Welcome back my fellow hackers! I was thinking recently, and came to the realization that we haven’t really been cooking up any homemade tools here at HackingLoops, so I’ve decided to change that. Today we’re going to be learning about SMTP user enumeration, as well as building an enumeration tool of our very own and taking things further than just using the python smtplib to send emails.
First, we’ll discuss the SMTP protocol, then we’ll follow it with the purposes and potential of this enumeration. Once we’ve covered that, we’ll discuss the methods that we can use to enumerate these users and test smtp. After all that is said and done, we’ll start constructing our own script. So, let’s get started!
The SMTP Protocol and User Enumeration
What is SMTP?
SMTP, short for Simple Mail Transfer Protocol, defines the standards used to transmit e-mail between systems. SMTP is not only used by mail servers for relaying messages to one-another, it is also used by the e-mail client of the end-user in order to transmit a message to the mail server for further relaying.
What is SMTP User Enumeration?
These SMTP servers have users registered on them, and these users have e-mail addresses. By sending probes to the server in the form of certain commands, we can tell if a given user exists. By repeating this process again and again with a list of varying usernames we may be able to identify a multitude of users or e-mail address on the target server. By verifying the existence of these users, we can then proceed to send out phishing attacks directly targeted at them.
How Does SMTP User Enumeration Work?
There are 3 commands in the SMTP protocol that we can use to enumerate a user: VRFY, EXPN, and RCPT TO. The VRFY command is short for verify, and is actually mean’t to validate usernames and addresses. Because of its innate purpose, many administrators disable the VRFY command to stop spammers. The EXPN is very similar to the VRFY command and doesn’t really require extra explaining.
The RCPT TO method is different however. First, we need to discuss the MAIL FROM command. This command identifies the source address of an e-mail being sent. Once we send a MAIL FROM command, we use RCPT TO method to identify the recipients of the e-mail. By repeating RCPT TO commands after the MAIL FROM command, and never actually finishing the started e-mail, we can identify the existence of any user we’d like. Now that we understand SMTP and SMTP user enumeration, let’s get started on building our script!
(Note: the script can be found here on Pastebin. The screenshots here do not have comments, but the Pastebin post does, so I suggest you keep it open and reference it while we go through it here.)
Building the Enumeration Script
Step 1: Beginning the Script and Initializing Class
In order to keep this simple, all our functions will be housed under a single class. Once we’ve completed these functions, we will be able to create an instance of this class and execute the functions as we need. In this step we are first going to set our interpreter path, import a module we’ll need, and initialize our class:

As you can see, we only need a single module at this point, socket. The socket module will allow us to create and utilize network connections. Our class also takes a number of arguments, these being: the target IP address, the file containing usernames to try, the port number to connect to on the target, a scan type, and an address to use if a MAIL FROM command is required (RCPT method). Also, two empty self attributes are created, self.sock will later contain the socket object that connects to the target and self.targetBanner will store the banner from the target server when we connect for the first time.
Step 2: Function to Read List of Users
Next up, we’ll be creating the function that will read the file containing the list of usernames supplied when the object was created. In our init function, we stored the path to the file in self.userlist. Using this, we can read and parse the file, after which we can store the new list in self.userlist, replacing the file path:

Since this function won’t be executed till later, our list of users will remain un-read until we call it. Once it’s called however, the list will be read and stored.
Step 3: Function for Constructing and Handling Sockets
Naturally with a script like this, we’ll be using sockets in order to make and use the connection(s) to the target server. In order to ease the implementation of these sockets, we’ll be building a pair of functions to handle their creation:
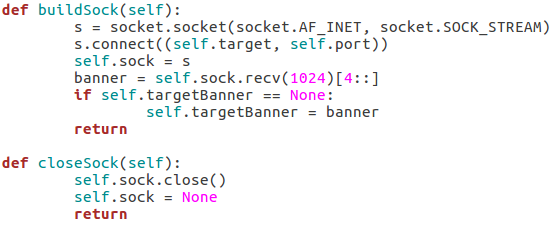
Our first function, buildSock(), follows these steps: create the socket object, connect the socket to the target IP address on the target port number, store this connected socket object in self.sock, receive the server banner, and store the server banner in self.targetBanner (if it hasn’t already been stored there). The closeSock() function is simple and not really necessary, but it does save us from repeating some lines of code later. It simply closes the socket object in self.sock and resets its value to None.
Step 4: Function for Checking Vulnerability to Scan
This function will read the type of scan that was chosen and test the target server to make sure that it’s vulnerable before the enumeration begins. We can do this by attempting to use these commands:
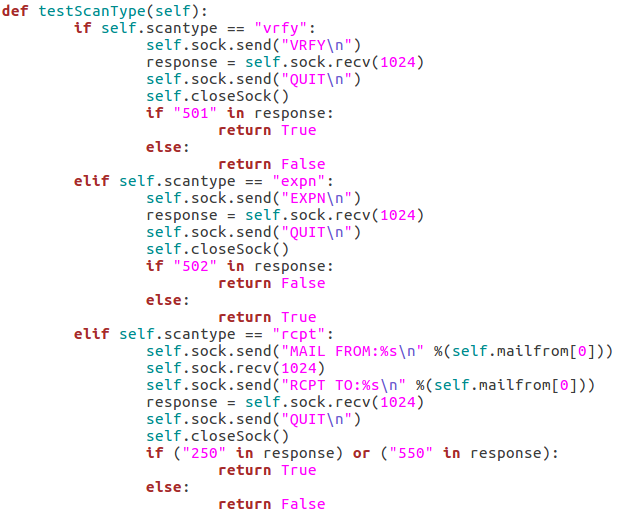
The first test is the VRFY test, which will send an empty VRFY command to the target. If the target responds with 501 (the SMTP reply code for a syntax error), then the VRFY command is available to be used. The second test will check for vulnerability to the EXPN method. This can be accomplished by sending an empty EXPN command, and if the target responds with a 502 (command not recognized) then the EXPN command will not work. The final test is for the RCPT command. We start by sending our MAIL FROM command containing the given/default username. We then send an RCPT TO command targeted at the same user. If the target responds with 250 or 550 (OK or user unknown) then the RCPT TO method is available for use.
Step 5: Functions to Probe Target for Username
These next four functions will all be related to probing the target for a given username. I’ll go ahead and throw up the screenshots, then we’ll discuss them:
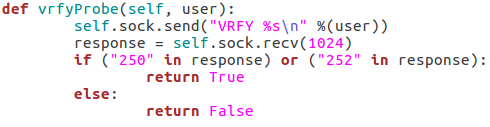
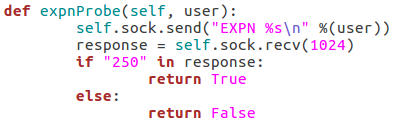
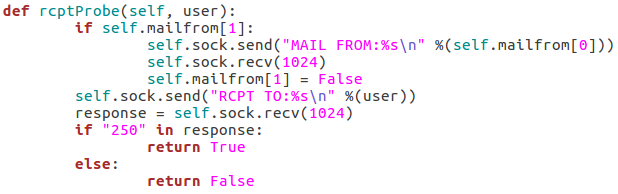
These three functions all behave similarly to each-other and to the function for checking the targets vulnerability to the scan type. The commands are repeated as they were before, but this time we add the username we’d like to enumerate to the command. If the target responds to this with 250(OK) then this means that user exists (252 is also an acceptable value for the VRFY method). Finally, we have this function:
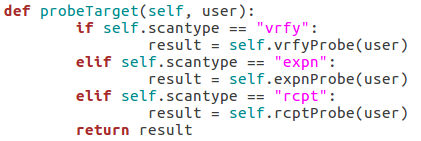
This function simply parses the string that was supplied as the scan type when the class is created and probes the target for a given username using that probe method. This will allow us to supply usernames to a single function while still probing the target using the proper method.
Step 6: Taking and Parsing Arguments
Now that all of our functions are complete, we can start putting together the body of our script. First, we’ll import some other modules and then we’ll set up and parse the arguments for the script:
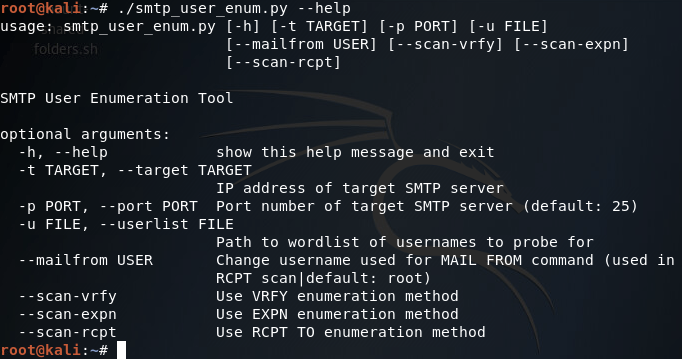
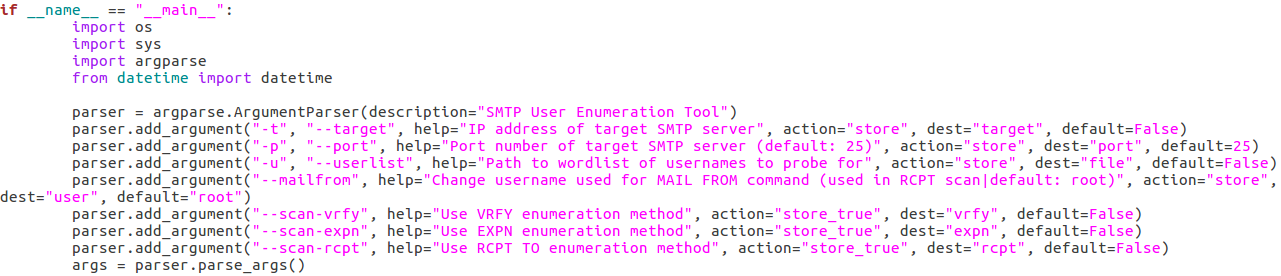 Here we can see that we have seven arguments available when using this script. Firstly, we have the target IP address and port number, then there’s the file path to the word-list containing the usernames to probe for. There is also a switch for each scan type (one of which must be supplied) and finally there is an optional flag to specify the username/e-mail address to use with the RCPT TO method.
Step 7: Detecting and Reporting Bad Input
A big problem in scripting is that invalid user input can really gum up the works. The easiest way I’ve found to combat invalid input, is to make sure you never get invalid input. We can do this by running a series of checks to make sure everything is in order before we continue. First, we’ll validate the target IP address:
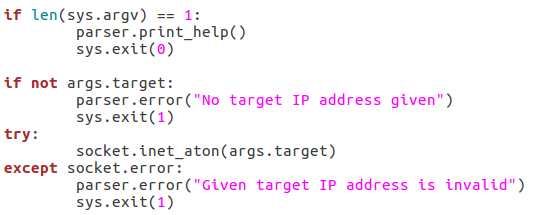
We start by checking to see if a target has even been supplied. If it hasn’t, we can raise an error through the parser to tell the user that one is required. If an address is given, we can run it through the socket.inet_aton function, which will raise an error if the IP address is invalid. Now that we’ve handled the validation of the target IP, we should move on to validating the port number:
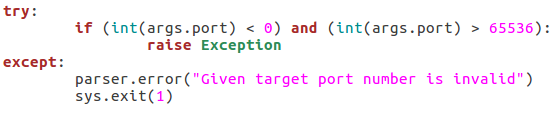
This block of the code will check that the given port number is in the correct range of integers, if it is not, an exception is raised, and the port number is reported as invalid. The try/except block will also give this report if the int() function raises an error (a non-integer value being given). Next up we’ll check that the path for the word list is in order:
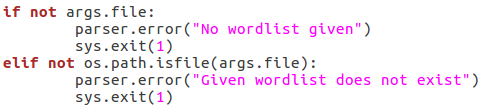
First, we make sure that a file path was given. If a file path was given, we use the os.path.isfilefunction to evaluate whether or not the file actually exists. If an existent file path was given and the checks are passed, nothing happens. Next up, we will be verifying the chosen scan type:

First, we pull all the scan type values out of the arguments and put them in a list. We then use an ifstatement to say this: if there is more than one true value or zero true values, return an error. This will allow us to filter out invalid scan type input. Now that all our checks have been completed, we can move on to executing the enumeration.
Step 8: Performing Enumeration
Now that we’re starting our enumeration, we need to create an instance of our SMTPUserEnumerator and pass all the arguments we received:

The if/elif block simply identifies the type of scan that was chosen and stores that value in scantype. Also, before we construct the enumerator object, we print back to the user: the chosen scan type, the target IP, and the target port number. Now that we have our enumerator object, we can run the testScanType() function in order to validate the targets vulnerability before we continue:
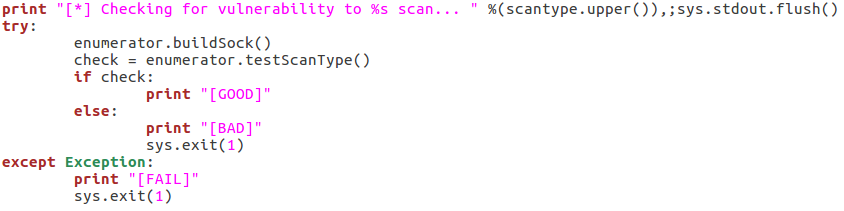
As you can see here there are three possible responses to the vulnerability check: good, bad, and fail. A good result means that the checking function returned true, a bad result is returned for false. Also, if an error is generated, the check is reported as a failure and the script exits. Now that we’ve checked the target, we can parse the list of usernames:

This is fairly self explanatory; we print that we’re parsing the list of users, then call the readUsers()function on our enumerator object. Should this process fail, the script will say so and exit. Once the usernames are read we can move on to the actual enumeration:
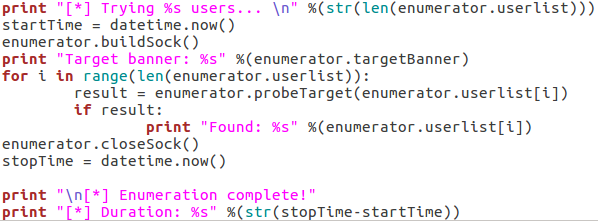
We start our final code block by printing how many usernames we need to try. Once we’ve done that, we use datetime.now() to start the clock for tracking the duration of the scan. We then call buildSock() to re-connect to the target and print the targets SMTP server banner. We then loop through the list of usernames and call the probeTarget() function for each of them. If a username is reported as good, we print it and move on.
Once the enumeration is complete, we call the closeSock() function and stop the clock for the duration. We then print that the scan is complete and print the difference between the two time values we took (resulting in the elapsed time from start to stop). Now that our script is complete, there’s only one thing left to do!
Step 9: Test the Script
We’ll be testing our script against a Postfix ESMTP server running on an Ubuntu Server 16.04 LTS VM. We’ll start by using the –help flag in order to print the help page for our script (it is automatically generated with argparse):
Our help page is looking good! Before we continue with this enumeration however we’ll need to build a small list of usernames. I’ll be using the cat command in the Kali CLI for this purpose:
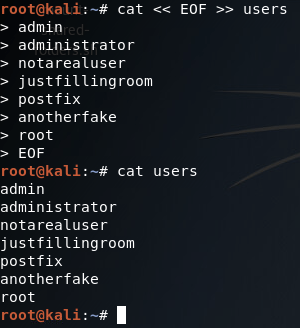
Alright, now we’ve got our list of usernames stored under a file named users. Now that we’ve got that squared away, we can begin testing our different scan types, of which we’ll be starting with the VRFY method:
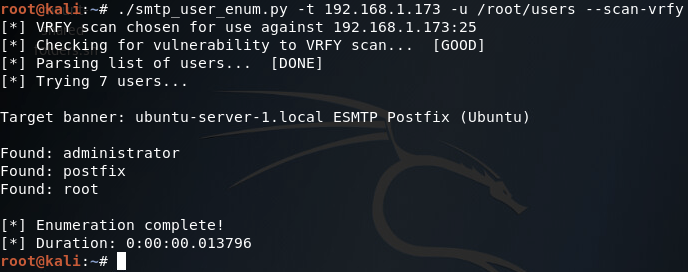
There we go! Our script works! Now let’s move on and test the EXPN scan method:

Our script tells us here that this target is not vulnerable to this type of scan method, which is true (I tried it manually with a telnet session and the command is unrecognized). Finally, we have our RCPT TO method:
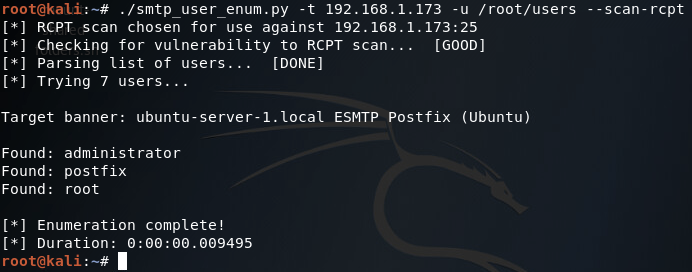
There it is, two of our three scan methods work on this target. Hopefully this helped you learn more about SMTP user enumeration (it definitely helped me), and you can expect to see more home-cooked scripts in the near future!
(Note: just in case you missed the link earlier, the script can be found here.)
How to Use Dotdotpwn
In this dotdotpwn tutorial, we’re going to show you how to use Kali Linux to test applications for weaknesses and vulnerabilities. Like most other Kali tools, this command line utility has a strange name and is run from the command line. But before we begin, I’d like to point out a few things.
First of all, this tutorial assumes that you already know your way around a Linux system, and are comfortable working from the command line (i.e. the BASH shell). In addition, I assume that you already have Kali Linux installed, or at least have a live-bootable version of the operating system. If you don’t already have Kali Linux, consider you can use it in the following ways:
- Install it directly to your HDD, perhaps in a dual-boot scenario
- Install it directly to a flash drive, and boot via USB by changing the default boot order in your BIOS
- Take advantage of VMWare from a Windows or Mac environment and simply create a virtual machine
Kali can be downloaded from their site, and it would be good to grab the newest version.
What the Heck Does Dotdotpwn Actually Do?
The simplest definition of dotdotpwn is that it is a fuzzer. Ah, but what’s a fuzzer, you ask? A fuzzer is a type of debugging and penetration testing tool that targets software to look for vulnerabilities. Usually it tests for flaws in the code that will help identify loopholes, data validation errors, incorrect parameters, bad data, erroneous data types, and other such programming anomalies.
Whenever the software or service encounters one of these anomalies, it likely won’t know how to respond, making it possible to leverage the flaws as an attack. For instance, if I were a hacker targeting a corporate web server, I might be able to find a flaw in the web server’s code. Perhaps the corporation hasn’t installed the latest updates for the HTTP service software, or some other related oversight.
By using a fuzzer, I discover a data validation error that allows me to exploit a type of DoS attack. Exploiting the discovered vulnerability (in this example) causes the server to crash, and denying web access to all of the internal employees. This isn’t the only type of application error, however. Note that these types of errors are actually quite common among a whole range of different types of technologies and protocols.
For instance, there is another type of attack that isn’t so different, which is known as SQLi. SQLi (SQL Injection) attacks work by inserting database commands into web forms that haven’t been properly sanitized. The bottom line is that software and services will always be fallible, making it possible for hackers to find ways to break the system.
About Dotdotpwn
Dotdotpwn is a fuzzer, and it is has a lot of flexible use cases and various attack vectors. It can help an attacker find vulnerabilities in all kinds of systems and services from simple HTTP web servers to blogs and content management systems. One of the things I find most interesting is that it even has a module that is protocol-independent, which means you could theoretically address an attack payload to an individual computer on a port of your choosing.
This useful fuzzer was written in the Perl programming language. And surprisingly, not only can it be run from most Linux operating systems, but Windows as well. Nevertheless, it is so useful that it is included in the Kali packages. In fact, it was included in BackTrack Linux, which is Kali’s predecessor. The following include dotdotpwn’s different modules:
- HTTP and HTTP URL
- FTP and TFTP (Trivial File Transfer Protocol)
- A protocol independent payload module
- STDOUT
Syntax and Options
Let’s start by taking a high-level overview of the tool, it’s syntax, and it’s options. The following is the basic syntax of the command:
- ./dotdotpwn.pl -m [module] -h [host] [additional_options]
Furthermore, the following are the possible options and their respective values you can append to the end of the command:
- -m <module> Selects a module such as http, http-url, ftp, tftp, payload, or stdout
- -h <host> Specifies a hostname to target
- -O Uses NMAP for intelligent operating system detection
- -s Detects the target’s service version
- -d Deep of traversals
- -f Specific filename
- -u <url> URL with the part to be fuzzed marked as TRAVERSAL
- -k [string_pattern] String pattern to match in the response if it’s vulnerable
- -U <username> Specifies the default username
- -P <password> Specifies the default password
- -p <file> Filename with the payload to be sent and the part to be fuzzed marked as TRAVERSAL
- -x <port> Port to connect default: HTTP=80, FTP=21, TFTP=69
- -t <number> Time in milliseconds between each test default: 300
- -b Break after the first vulnerability is found
- -q Quiet mode
In practice, you won’t need to use each of these options every time you use dotdotpwn. Instead, you only need to know a small subset of these options, though I want to point out how flexible this fuzzer tool is.
Dotdotpwn Tutorial and Example
In this brief example, we’re going to be running through an example that tests a target for HTTP weaknesses and vulnerabilities. The command syntax is as follows:
- ./dotdotpwn.pl -m http -h 192.168.1.1 -x 8080 -f /etc/hosts -k “localhost” -d 8 -t 200 -s
In this example, note first that it is using the HTTP module and targeting 192.168.1.1. Also, it’s worth noting that it’s listening on port 8080, which is typically used to establish HTTPS connections. Next, the -f command will attempt to capture the etc/hosts file, and look for the keyword “localhost.”
This is pretty typical syntax for the HTTP module, but note that you can substitute different values for the options. For instance, you could change the listening port number to 80 (HTTP). In addition, you can append additional options to the command.
Final Thoughts
This is just one example of how you can find vulnerabilities with the HTTP module, though there are many other modules. Nevertheless, I would warn you against running these vulnerability scans and fuzzing operations on real-world devices. Doing so could very well be illegal if you don’t own the equipment or server.
If you wanted to test out the HTTP module, you could setup a home-brewed Apache web server. Just make sure that you only use and test this tool in the privacy of your own home. Using it in public places could mean you are asked some awkward questions if you get caught, such as why you’re looking for vulnerabilities on someone else’s computing system.
How to Perform ARP Scans

ARP scanning is a process used to identify other active hosts on a local network, and they’re surprisingly easy to perform. Every aspiring hacker needs to have a solid understanding of fundamental networking protocols, and ARP is near the top of the list. Without ARP, LANs would cease to function, and you need to feel comfortable checking the contents of your ARP cache as well as understand how to perform ARP scanning.
What is ARP?
ARP is a very important networking protocol that binds layer two addresses to layer three addresses. With IPv4, ARP (Address Resolution Protocol) makes one to one links between MAC addresses and IP addresses. But ARP is frequently used by hackers to poke around and feel out local network topologies. Most often, the process of using an ARP scan falls under the reconnaissance umbrella, too. But before we look at different methods to perform ARP scans, you need to know how ARP operates on a technical level.
How ARP Can Be Used to Identify Hosts on a Network
When an attacker first connects to a new network, the hacker doesn’t have a clear picture of what other computers or devices are active. As such, they don’t have clearly defined targets for their attacks. Fortunately for a hacker, ARP can be used to illustrate the local network topology and identify hosts that have made ARP requests.
Any layer two device, such as a switch, keeps an ARP table to keep track of which MAC addresses correspond to various IP addresses. Also, most people don’t realize that a home router is really three devices in one. They are routers, wireless access points, and many have a small four-port switch as well. This means that any home router is going to keep an ARP table, but without access to the configuration interface, the attacker can’t see the ARP table’s contents.
You might also be surprised to learn that end-user devices such as phones, tablets, and PCs also keep an ARP table. If they are trying to send data to a host on the same subnet, no routing is needed, so the computer consults their ARP table to find the corresponding layer 2 address (MAC address) to send their data to. If, for example, a host wanted to send files to a NAS device on the same subnet, they would first resolve its domain name to an IP address (if a domain name is used), discover its IP address, notice that no routing is needed since it is on the same subnet, and the consult the ARP table to address frames to the host’s MAC address.
But what happens if the host doesn’t have an entry in the table for a given IP address? Well, the host simply send a local network ARP broadcast, which is very simple in nature. In layman’s terms, the host basically sends out a message to every host on the local subnet along these lines: “Hey, I need to send data to hos X.X.X.X. Which of the connected local devices has this IP address, and what is your MAC address?” After the broadcast has been sent, the correct host will send a unicast message back to the querying device and identify themselves via their MAC address.
Viewing the Contents of Your Computer’s ARP Table
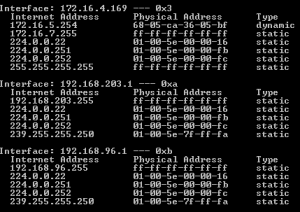 There are some simple commands that can be entered into a command prompt that will display the contents of your ARP tables on a per-interface basis. For Windows users, simply open a command prompt and enter the following command:
- arp -a
The command prompt will then spit out the contents of the ARP cache and show each known MAC address and its corresponding IP address. For Linux users, simply issue the following command from a command prompt:
- ip neigh
This will display the ‘neighbor table,’ which is just the ARP cache by a different name. Though Linux systems did have a similar arp command, it is now deprecated with the use of net-tools.
ARP Scanning Demonstration
At its core, ARP was designed to trace IPv4 addresses on a local network. That makes it very easy for attackers to increase local network visibility and track down other hosts. In this demo, we’ll assume that you’re performing ARP scans from a Linux system. The following is the structure of the ARP-Scan command:
- arp-scan [OPTIONS] [HOSTS]
The result of this command is that any hosts supplied in the parameters will be sent ARP packets. Then, the command’s output will display any responses that were received, which indicate active hosts. You’ll want to be sure to use the –interface option to specify which interface you want to perform the scan on.
Otherwise, the command will send the ARP scan on the lowest numbered interface. This can be a real pain if you have multiple interfaces such as VPN interfaces, virtual VMWare interfaces, Ethernet, and wireless. Also understand that you can use the –localnet option to specify the local subnet of the desired interface, which helps eliminate the need for tedious subnetting math (essentially, it will scan every host in your subnet).
The end result is that you’ll be able to see all the other connected hosts on your subnet, which could then lead to other types of attacks such as man-in-the-middle attacks, packet captures, DoS attacks, and so forth. Remember, before a hacker can carry out an attack, they first need a target.
Introduction to Packet Manipulation with Scapy
Welcome back everyone! In the last recon article, I stated that we’re going to be building our own ARP scanner for network enumeration and host discovery. We’re going to be building this ARP scanner in Python, with the use of the Scapy module. Scapy is a packet manipulation tool. For those of you that don’t know, a packet is a small unit of data that travels across a network (There are different names for different units, but we’ll use “packet” a general term).

Being able to build custom packets give us immense power. We can make whatever packets we want. Imagine the possibilities; we could launch a DoS attack, we could launch a port scan, or in our case we can build an ARP scanner!
This article is just going to be an introduction to Scapy so that we’ll know how to use it later. We’re going to build some custom packets and ping a host on our network. We’re going to do a normal ping first, then we’re going to spoof our address during a ping to prove that we can manipulate every aspect of a packet. So, let’s get started!
Step 1: Start the Python Interpreter and Import Scapy
Scapy is a module for Python, this means that in order to use the features of scapy to the best of our ability, we should import the module into Python. For our testing today we’re only going to be using an interpereter that is running live inside of a shell in our Linux distro. In order to fire up our interactive Python shell, we just need to enter “python” into the BASH shell. Let’s go ahead and open up our interpreter:
 Now that we’re in our live interpreter, we need to import scapy. I suggest you read the Ruby crash course, as the information learned there will make this easier to comprehend. If you did read the Ruby articles, you’ll remember the concept of libraries and modules. Groups of code that are specialized for certain tasks. In Ruby, we ‘require’ these modules, but in Python, we ‘import’ them. Let’s import our scapy module now:
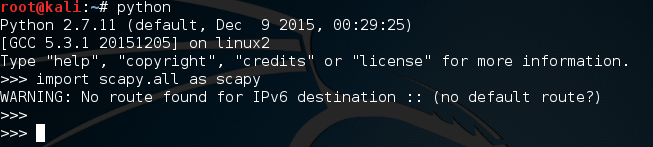 It’s worth noting that this error will be printed every time we import scapy unless we manually suppress it. Now that we have our interpreter up and running and we’ve imported scapy, we can go ahead and make our packets.
Understanding the OSI and TCP/IP Models
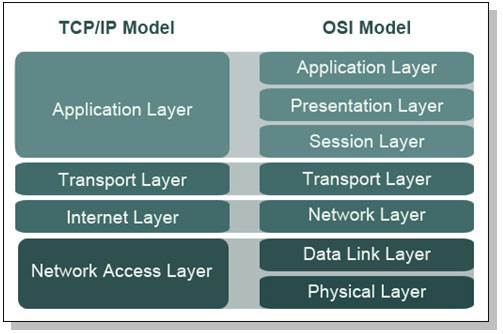
In order to understand how these packets work, we need to understand the OSI and TCP/IP models. These models represent how packets are encapsulated. When packets are send across the network, they are packed with information. This information is packed into layers, and only one layer is packed at a time. Let’s see a photo of the OSI model:
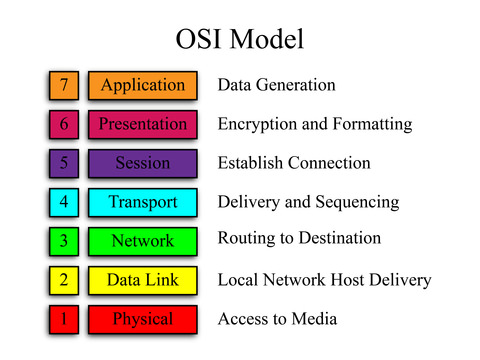
The OSI model is made of seven layers. Let’s imagine an HTTP packet coming from a website. At the application layer we’d have HTTP as it is an application layer protocol. The presentation and session layers are both associated with protocols resting above and below them. The transport layer is responsible for transporting our data (who would’ve guessed?), at this layer we have our trusting TCP and it’s not-so-caring counterpart UDP. Then we have the network layer. If you’ve ever heard someone refer to and IP address as a layer 3 address, this is because IP rests at layer 3 of the OSI model. Next up is the data link layer. This is where LAN restricted protocols like ARP reside. Finally we have the physical layer. This is the final layer before the packet is actually put on the network.
Packets are encapsulated (packed) going down the OSI model. The actual data being carried by a packet is stored under the application layer. If packets are built moving down, that means they are dissected at their destination by moving up the OSI model. We’ll learn more about this model later, but this will provide a basic understanding for now.
Side note: The TCP/IP model is a condensed version of the OSI model:
Step 2: Craft and Send the Packets
Now that we know how the OSI model works, we can build our packets. When we build our packets, we need to build then backwards. Let’s build our normal ping packet first. For those of you who don’t know, the protocol behind ping is ICMP (Internet Control Message Protocol). Ping rests at layer 3 of the OSI model, so we won’t need to put anything more than the IP and ICMP layers. These layers are more commonly known as headers, so I’ll be referring to them as such for the remainder of this article.
Let’s go ahead and assemble our normal ping packet:
 We can see that we first packed our IP header with the destination address of 10.0.0.1, then we packed our ICMP header that signifies this packet as a ping packet. There is quite a bit that we didn’t configure here, that’s because scapy will auto-fill anything that we leave blank. This makes it easy to get just what we want without the hassle of configuring an entire packet.
Now that we have our normal ping, let’s send it and get our ping-back. We’re going to be using the sr1() function from scapy, this stands for send/receive 1. This function will send the specified packet and will receive one response packet. Let’s go ahead and send our packet:
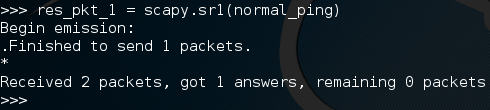 There we go! Now, when we send a packet, scapy will listen to all incoming traffic until it times out or receives a response. Here we received a response packet and we’ve stored it under the name “res_pkt_1”. Let’s read this stored packet:
 We can see that packet comes from 10.0.0.1, and that it is an echo-reply ping packet. This means that the host responded, we successfully made and sent a ping! Now that we get the gist of making and sending packets, let’s send another ping packet, but this one will be a bit more complicated.
Let’s see the construction of our packet:
 Here we’ve defined our weird ping packet with the same destination, but this time we’re going to spoof the IP address as 1.3.3.7. We’ve got the same ICMP header, but now we have a whole new header. This is a raw data header. Whatever we set ‘load’ equal to will be packed in as raw data. We’re going to sniff this packet in wireshark so now is a good time to open that up. Let’s go ahead and send our packet:
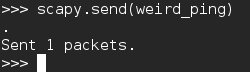 You may notice that we used the send() function instead of a send/receive function. This is because the source address is 1.3.3.7. This address doesn’t exist on the network, so we won’t receive an echo reply. Let’s take a look in wireshark and see what happened:
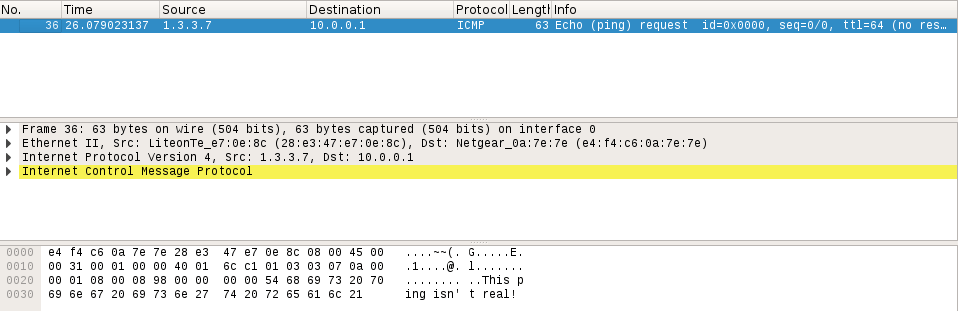
At the top we can see that the source of this packet is the address we inserted into it, 1.3.3.7. We can see that it is in fact a ping packet, and if we look at the bottom, we can see a jumbled mess of letters and dots. At the end of this mess, we can clearly see the words “This ping isn’t real!”. This is the raw data that we inserted into our packet by force. We did it!
That concludes this article. We’re definitely going to be using scapy more, also, we’re going to learn the basics of Python to use in conjunction with scapy. We’ll eventually get around to networking and learning about the OSI/TCPIP models, but let’s take it one thing at a time. In the next article, we’re going to be starting to learn Python, I’ll see you there!


0 Comments
Thanks for comment.