There are three primary CSS preprocessors on the market today, Sass, LESS, and Stylus. In this post, we will be comparing the two preprocessors which seem to be the most widely used among developers, Sass vs LESS. By switching to a preprocessor can help streamline your development process.

What is a CSS Preprocessor?#
Writing CSS can become quite repetitive and little tasks such as having to look up hex color values, closing your tags, etc. can become time-consuming. And so that is where a preprocessor comes into play. A CSS preprocessor is basically a scripting language that extends CSS and then compiles it into regular CSS.
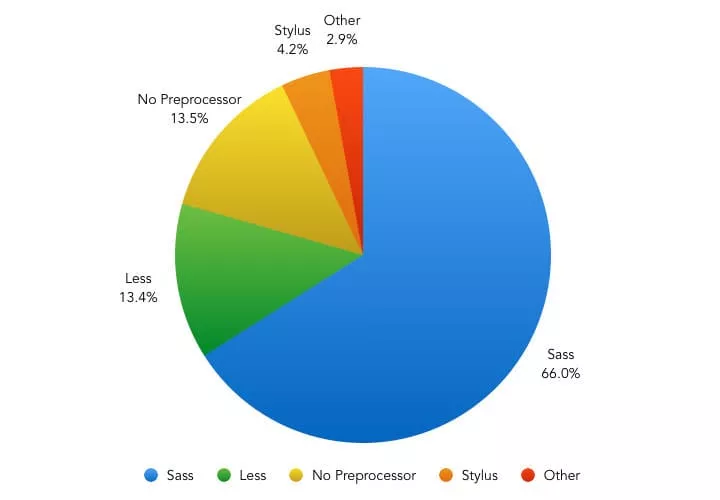
Ashley Nolan polled developers in a recent case study to see which preprocessors they preferred. 689 people voted for Sass while LESS received 140 votes.
And if we take a look at Google Trends for “Sass” (programming language) and “LESS” (programming language) it appears there is much more activity with Sass.

Advantages to Using a Preprocessor#
Once you have mastered CSS there are many advantages to using a preprocessor. One of the biggest is probably not having to repeat yourself. In other words, it makes your CSS Dry.
Here are some other advantages.
- Cleaner code with reusable pieces and variables
- Saves you time
- Easier to maintain code with snippets and libraries
- Calculations and logic
- More organized and easy to setup
Sass Vs LESS#
Sass and LESS are both very powerful CSS extensions. You can think of them as more of a programming language designed to make CSS more maintainable, themeable, and extendable. Both Sass and LESS are backward compatible so you can easily convert your existing CSS files just by renaming the
.cssfile extension to .less or .scss, respectively. LESS is JavaScript based and Sass is Ruby based.
Installation and Setup#
There are a couple ways to install and get going with a preprocessor. You can either use a 3rd party application or you can install it from the command line.
3rd Party Applications#
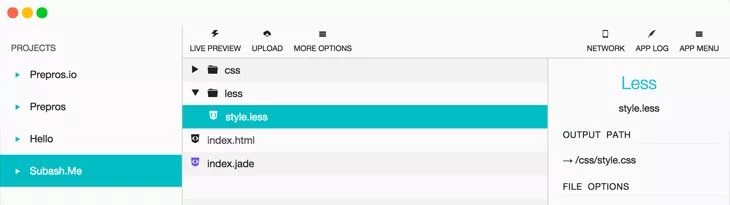
If you are just transitioning to preprocessors then we highly recommend using a 3rd party compiler as this will speed things up. Below is a list of some more popular ones, listed in no particular order.
Perhaps you are more comfortable with a CLI, so here is how to install Sass and LESS.
Sass#
To run Sass, you will need to have Ruby installed. On newer versions of Linux and OSX, Ruby already comes preinstalled. You can install Sass with the following command.
sudo gem install sass
There are also other libraries, such as libSass which now bring Sass to NodeJS, without any need for Ruby.
On Windows, you will need to first install Ruby. If you are on a Mac, Ruby already comes preinstalled.
- Open up your terminal or command prompt
- Install Sass
sudo gem install sass
LESS#
LESS is written in JavaScript so you will need NodeJS to run it.
- On Linux and Mac, you can install it using the following command.
npm install -g less - You can then use this command to compile to CSS.
lessc styles.less styles.css
On Windows you will need to install the NodeJS installer.
- Open up your command prompt
- Run
npm install less - You can then use this command to compile to CSS.
lessc styles.less styles.css
Code Editor - Syntax Highlighting#
After you have installed everything you then will probably want to setup a plugin or extension in your code editor to highlight Sass or LESS syntax with the proper colors. Here is a list of popular ones below, in no particular order.

| Code Editor | Sass | Less |
|---|---|---|
| SublimeText | Sass Bundle | Less-sublime |
| Notepad++ | Notepad-plus-plus | Less-for-Notepad-plusplus |
| VisualStudio | SassyStudio | CSS is Less |
| TextMate | SCSS.tmbundle | Less.tmbundle |
| Eclipse | Eclipse platform | Eclipse for Less |
| Coda | Coda Sass | Coda 2 Less |
There are also other popular 3rd party frameworks you can use along with the preprocessors such as Compass and Bourbon.
Variables#
With preprocessors, you have the advantage over traditional CSS because you can use variables. You can store things like colors, fonts, or pretty much any value you want to reuse later. See examples below.
Sass Font Example#
$font-stack: Helvetica, sans-serif;
$primary-color: #333;

body {
    font: 100% $font-stack;
    color: $primary-color;
}
CSS Output#
body {
    font: 100% Helvetica, sans-serif;
    color: #333;
}
LESS Color Example#
@nice-blue: #5B83AD;
@light-blue: @nice-blue + #111;

#header {
    color: @light-blue;
}
CSS Output#
#header {
    color: #6c94be;
}
Mixins#
Mixins are used to include a bunch of properties or group declarations together.
Sass Border Radius Example#
In Sass, you use
@mixin@mixin border-radius($radius) {
-webkit-border-radius: $radius;
-moz-border-radius: $radius;
-ms-border-radius: $radius;
border-radius: $radius;
}
.box {
@include border-radius(10px);
}
CSS Output#
.box {
    -webkit-border-radius: 10px;
    -moz-border-radius: 10px;
    -ms-border-radius: 10px;
    border-radius: 10px;
}
LESS Border Property Example#
.bordered {
    border-top: dotted 1px black;
    border-bottom: solid 2px black;
}

#menu a {
    color: #111;
    .bordered;
}

.post a {
    color: red;
    .bordered;
}
CSS Output#
#menu a {
    color: #111;
    border-top: dotted 1px black;
    border-bottom: solid 2px black;
}

.post a {
    color: red;
    border-top: dotted 1px black;
    border-bottom: solid 2px black;
}
Nesting#
Nesting is a huge advantage over CSS because it creates a visual hierarchy, similar to what you are used to with HTML. In the examples, you can see how there is less repetition of classes or divs needed since it is now in a cascade approach.
Sass#
nav {
    ul {
        margin: 0;
        padding: 0;
        list-style: none;
    }

    li {
        display: inline-block;
    }

    a {
        display: block;
        padding: 6px 12px;
        text-decoration: none;
    }
}
CSS Output#
nav ul {
    margin: 0;
    padding: 0;
    list-style: none;
}

nav li {
    display: inline-block;
}

nav a {
    display: block;
    padding: 6px 12px;
    text-decoration: none;
}
LESS#
#header {
    color: black;

    .navigation {
        font-size: 12px;
    }

    .logo {
        width: 300px;
    }
}
CSS Output#
#header {
    color: black;
}

#header .navigation {
    font-size: 12px;
}

#header .logo {
    width: 300px;
}
Import#
The standard CSS
@import allows you to split into multiple files. The problem with this is that it creates additional HTTP requests. Sass and Less work a little different. Instead of creating another HTTP request, they combine the files into one. Similar to concatenation.
Sass#
Let says you have a file named
_sheet1.scss. In your base.scss you can include it at the top by using the following: @import 'sheet1'; There is no need to have the extension.
LESS#
// Variables
@themes: "../../src/themes";

// Usage
@import "@{themes}/tidal-wave.less";
Extend#
This is another powerful feature. It lets you share properties from one selector to another.
Sass#
In Sass, you use
@extend.message {
border: 1px solid #ccc;
padding: 10px;
color: #333;
}
.success {
@extend .message;
border-color: green;
}
.error {
@extend .message;
border-color: red;
}
.warning {
@extend .message;
border-color: yellow;
}
CSS Output#
.message, .success, .error, .warning {
    border: 1px solid #cccccc;
    padding: 10px;
    color: #333;
}

.success {
    border-color: green;
}

.error {
    border-color: red;
}

.warning {
    border-color: yellow;
}
LESS#
In LESS you use
:extendnav ul {
&:extend(.inline);
background: blue;
}
.inline {
color: red;
}
CSS Output#
nav ul {
    background: blue;
}

.inline, nav ul {
    color: red;
}
Operations#
Unlike with CSS, you can do all sorts of operations in both Sass and LESS.
Sass Grid Calculation Example#
.container {
    width: 100%;
}

article[role="main"] {
    float: left;
    width: 600px / 960px * 100%;
}

aside[role="complimentary"] {
    float: right;
    width: 300px / 960px * 100%;
}
CSS Output#
.container {
    width: 100%;
}

article[role="main"] {
    float: left;
    width: 62.5%;
}

aside[role="complimentary"] {
    float: right;
    width: 31.25%;
}
LESS Square Root Example#
sqrt(18.6%)
CSS Output#
4.312771730569565%;
Those are just a few of the benefits you get from using a preprocessor. Note: Most of the examples above were taken from the official Sass and LESS documentation.
Active Development#
Both Sass and LESS are pretty active on GitHub, you can see some of the recent activity below.
| GitHub activity | Sass | Less |
|---|---|---|
| # of open issues | 138 | 208 |
| # of pending pull requests | 11 | 8 |
| # of commits in the last 30 days | 29 | 12 |
Summary#
As you can see CSS preprocessors are very powerful and they can help streamline your development process, especially if you are coming from a programming background. While it appears that Sass is more widely used, there isn’t really a preprocessor that is better than the other. It usually comes down to the developer and what they are comfortable with using. Both of them have feature-rich extensions which can help make your CSS more maintainable, themeable, and extendable.
Which CSS preprocessor do you prefer? Let us know below in the comments.


0 Comments
Thanks for comment.